


Let me start with a confession: I am terrible at keeping plants alive. It’s not intentional—I admire them, I name them—but somehow I always forget that tiny detail called watering. If you relate and still dream of a living room that feels calm, lush, and spa-worthy, moss wall art might just be your soulmate.
These projects use preserved moss, which looks and feels like the real thing but requires zero sunlight, zero watering, and zero emotional commitment. It stays perfectly green forever, like nature frozen at its best moment. Ever notice how some homes instantly feel serene and expensive? That’s usually because greenery—even preserved greenery—adds warmth, balance, and life to a space.
In this guide, I’ll walk you through ten simple moss wall art designs that make a big visual impact without turning into a weekend-long craft marathon. No microscopic gluing sessions, no artistic meltdown required. Grab a coffee, ignore that struggling houseplant for a moment, and let’s transform your living room with a little moss and a lot of style.
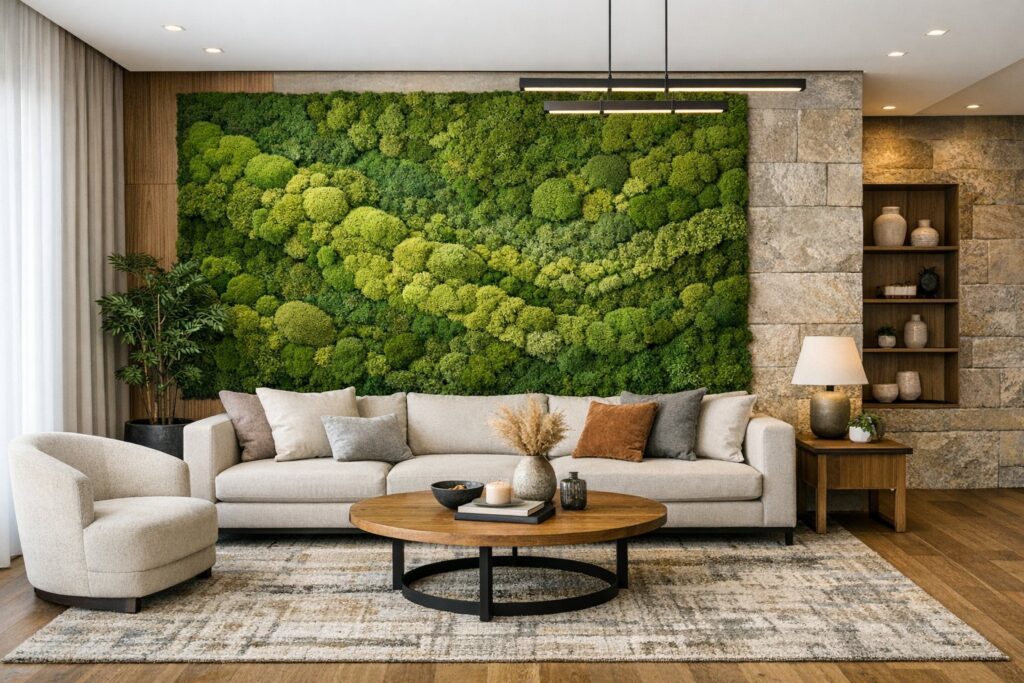
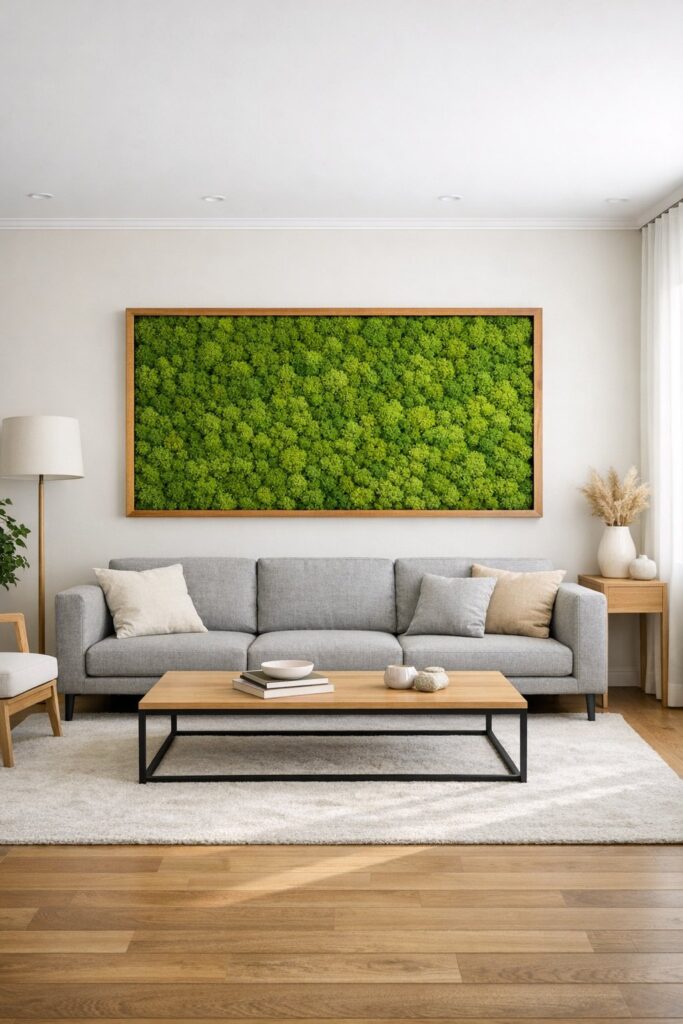
1. The Classic Framed Sheet Moss
How to Make It
Start with a deep shadow box or a sturdy wooden frame—the extra depth keeps the moss neatly contained. Coat the backing with wood glue or hot glue, then press large sections of sheet moss firmly into place. Fill gaps by tearing smaller pieces to size. Think puzzle, but forgiving. Press everything down well so it bonds evenly.
Why It Works
This design delivers a clean, modern look with minimal effort. A solid block of rich green mimics a living wall, instantly calming the room. It pairs beautifully with neutral walls and works as a grounding element behind other décor. You get all the benefits of biophilic design—without the responsibility.
2. The Hexagon Honeycomb Trio

The Layout
Hexagon frames grouped together instantly look intentional and high-end. Fill each frame with a slightly different moss type and hang them offset for movement and depth. It’s perfect for filling larger wall spaces without committing to one massive piece.
Choosing Moss
Reindeer moss works beautifully here thanks to its color range. Mixing in mood moss adds subtle height and texture. Stick to two or three similar tones to keep the look cohesive and polished.
3. The Textured Forest Floor Canvas

Building Dimension
This design is all about layers. Use a large canvas and combine moss, preserved ferns, bark, twigs, or even flat stones to create depth. Glue elements in varying heights to mimic a real forest floor.
Keeping It Balanced
Group similar textures together rather than scattering randomly. Taller elements near the edges help frame the piece, while shorter moss creates visual “valleys.” The result feels organic, intentional, and surprisingly luxurious.
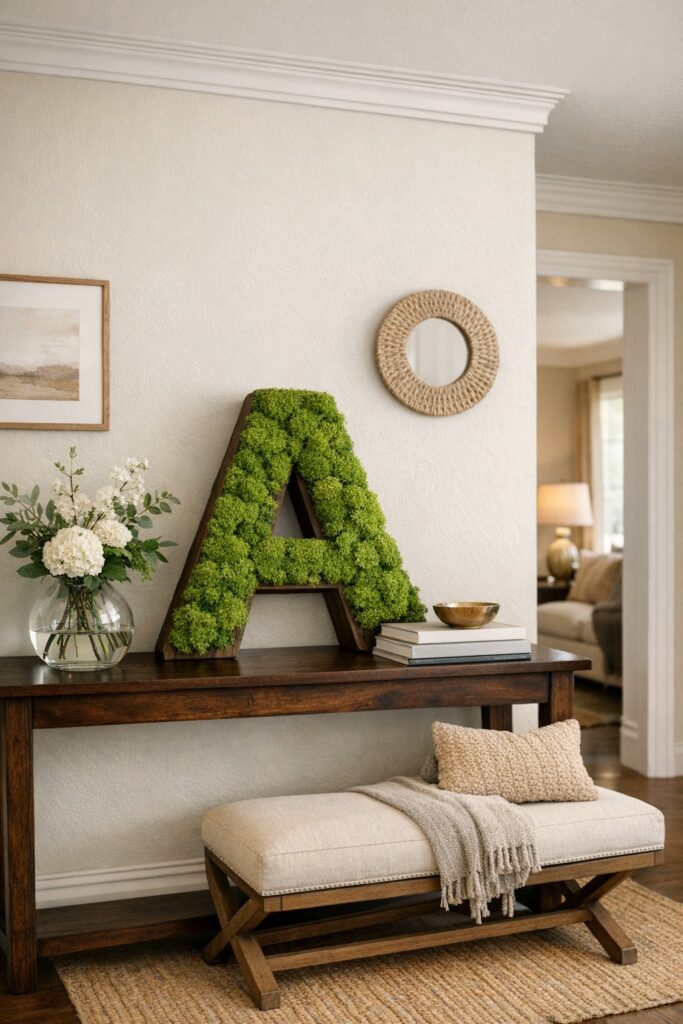
4. The Moss Monogram Letter
The Base
Wooden letters work best—they hold their shape and give clean edges. Apply glue and cover the surface with moss, wrapping slightly around the sides so no base shows through.
Where to Display
Lean it on a shelf, place it on a console table, or hang it as part of a gallery wall. The defined shape adds personality, while the moss provides texture without needing extra embellishment.
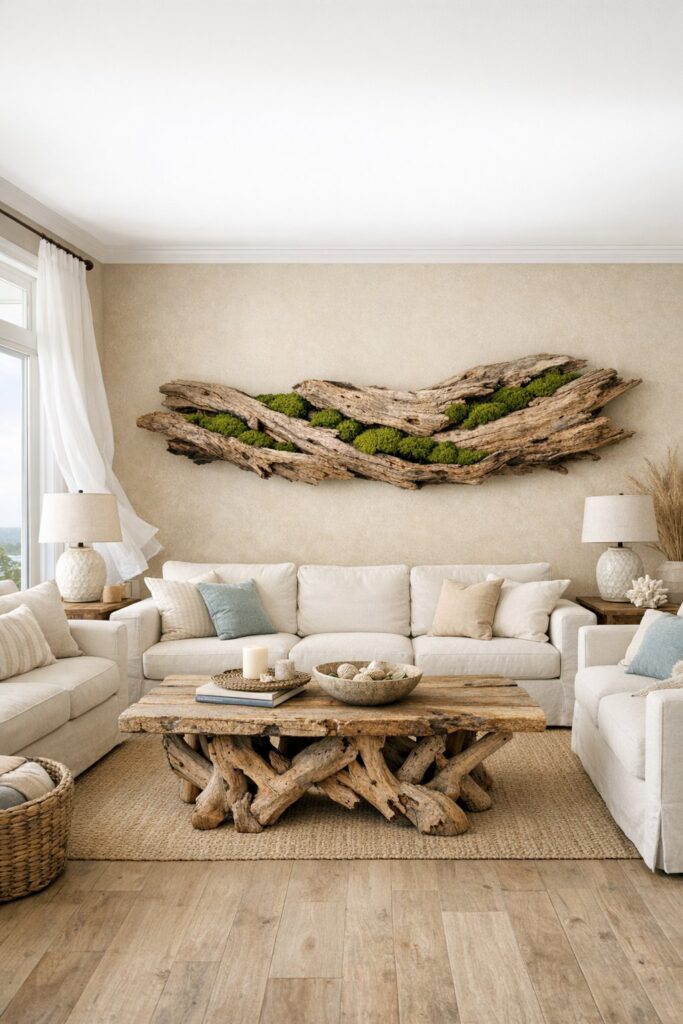
5. The Driftwood and Moss Sculpture
Natural Contrast
Driftwood makes a stunning base. Glue small tufts of moss into cracks and crevices so it looks like the greenery is naturally growing from the wood. The contrast between weathered wood and soft moss feels organic and refined.
Mounting Tips
Use strong wire or hidden brackets, and step back often while working so you don’t cover the wood’s best features. Less moss here makes a bigger impact.
6. The Vertical Ribbon Design
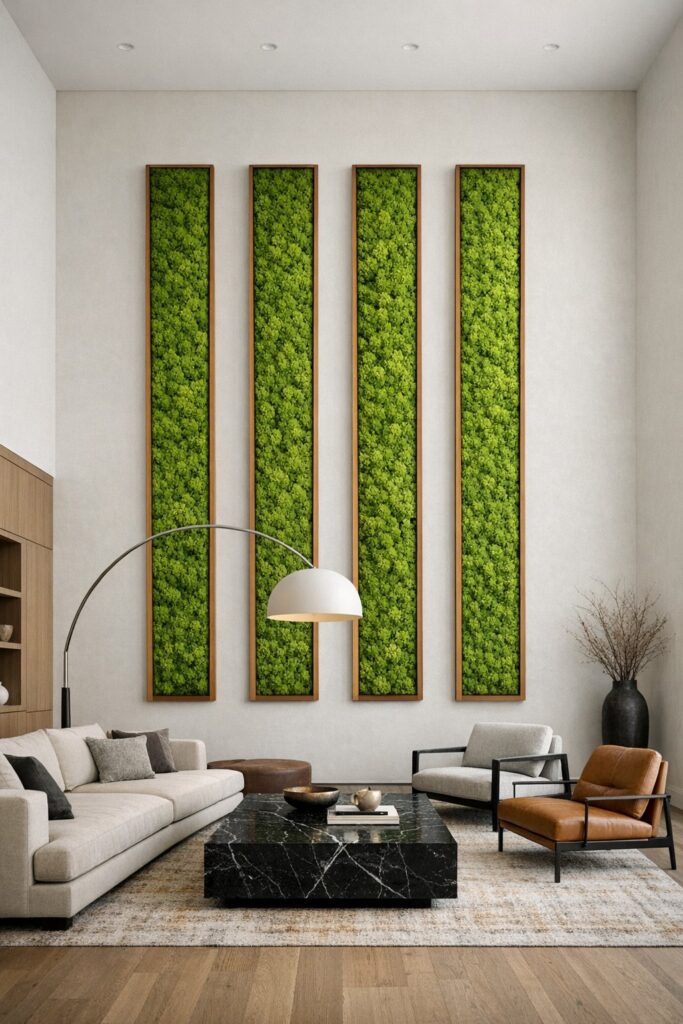
The Concept
Create several tall, narrow panels and hang them side-by-side. This draws the eye upward, making ceilings feel higher—perfect for smaller living rooms.
Why It Pops
Using vibrant moss keeps the slim panels visually strong, while spacing between them lets the wall color show through. The look feels architectural and custom, like something from a boutique hotel.
7. The Negative Space Wood Cutout
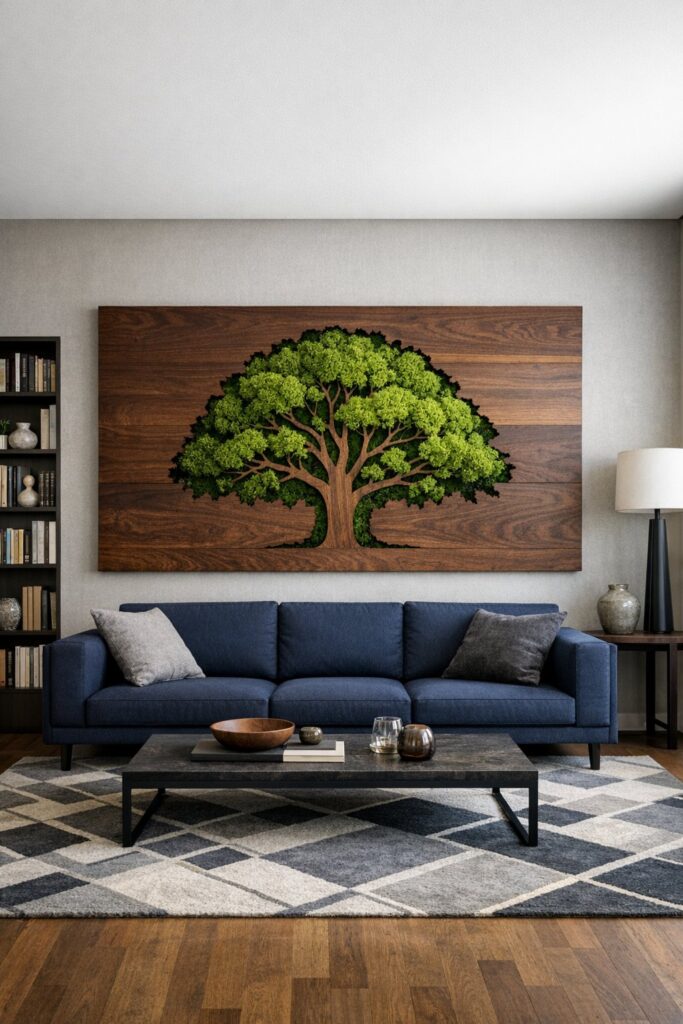
The Design
Use a wooden board with a shape cut out—trees, circles, or simple symbols work well. Place moss behind the cutout so the greenery fills the shape from within.
Best Moss Choice
Dense, short-pile moss keeps edges sharp and clean. Shaggier moss can blur the design. The result is sleek, modern, and gallery-worthy.
8. The Circular Hula Hoop Art
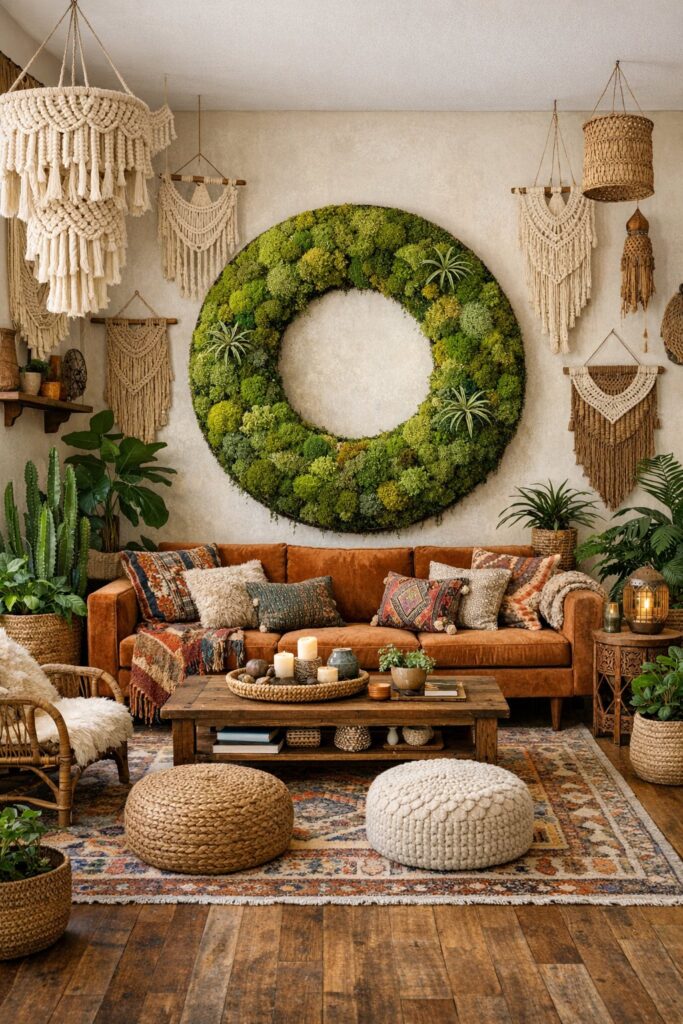
A Budget-Friendly Base
Wrap or paint a hula hoop, stretch mesh across the center, and use it as your frame. Once covered in moss, no one will guess its humble beginnings.
Styling Ideas
Use swirling patterns or concentric circles of moss to highlight the round shape. The softness of the circle breaks up straight lines and adds flow to your living room.
9. The Slate and Stone Mossscape
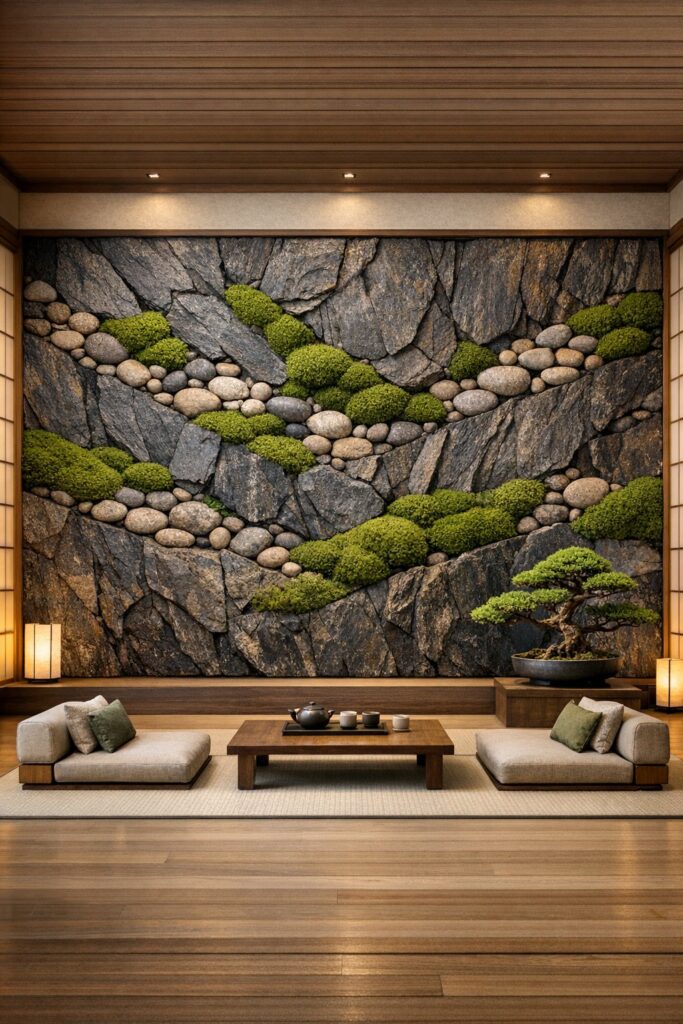
Texture Play
Combine slate tiles or river stones with deep green moss for dramatic contrast. Arrange stones first, then fill gaps with moss for a grounded, Zen-inspired look.
Pro Tip
Stick to muted, natural stone tones and use strong anchors when hanging—this piece has weight, both visually and physically.
10. The Minimalist Striped Panel
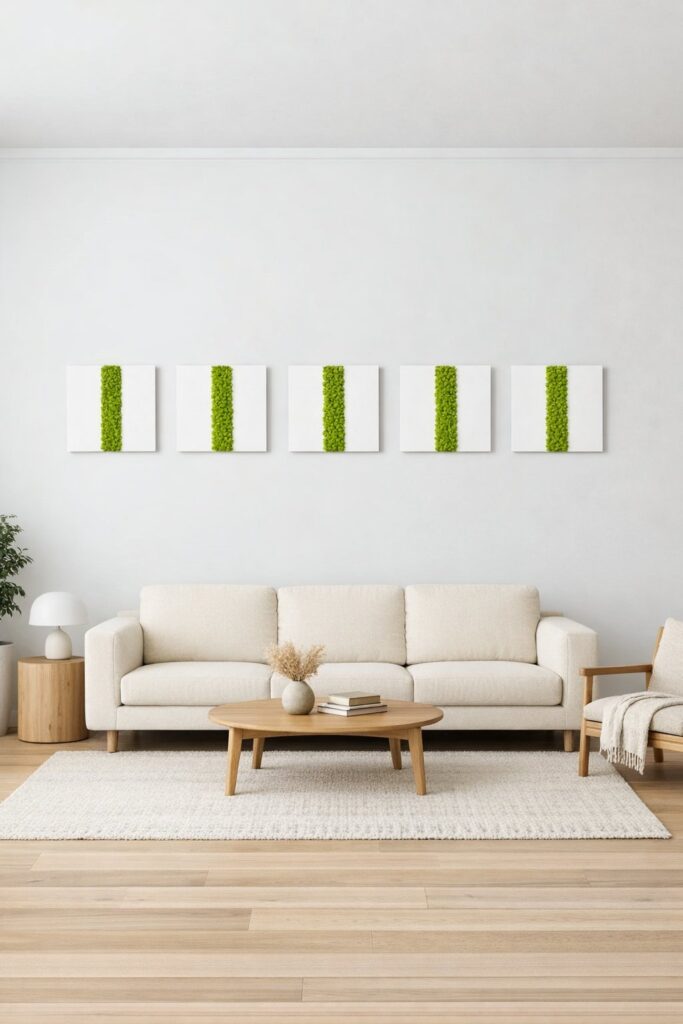
Clean and Modern
Create small panels with a single stripe of moss running through the center. Hang several in a straight line for a rhythmic, contemporary feel.
Finishing Touches
Bright reindeer moss creates striking contrast. Measure carefully for straight lines, and consider subtle metallic accents if you want a hint of luxury.
Bringing It All Together
Moss wall art is one of the easiest, lowest-stress ways to bring lasting greenery into your home. No watering schedules. No guilt. Just texture, color, and calm—forever.
Keep your moss art out of direct sunlight to prevent fading, dust it lightly now and then, and enjoy the fact that you finally found a plant you can’t kill. Whether you go bold with a circular statement piece or subtle with minimalist panels, your living room is about to feel warmer, fresher, and far more inviting.