
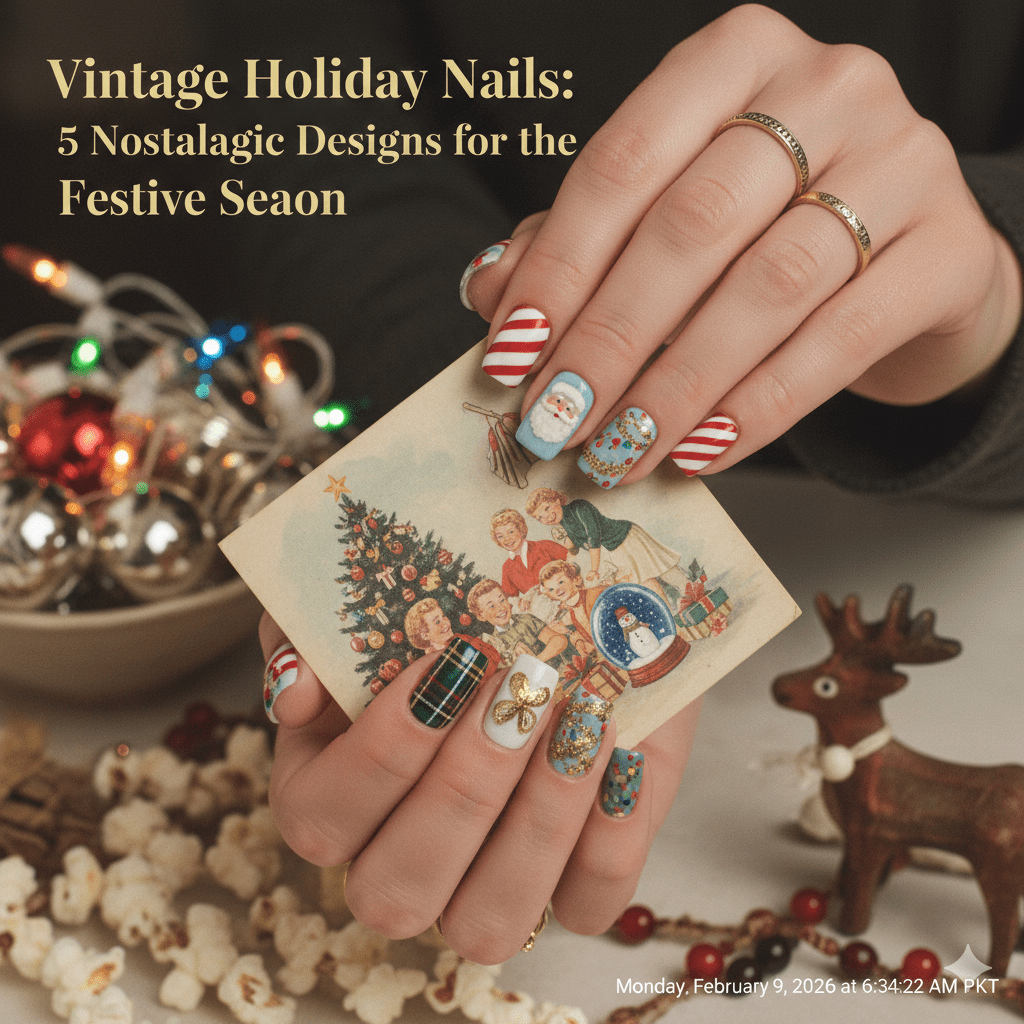

Ever painted your nails for the holidays and ended up with a look that feels more “random” than festive? I’ve seen many clients struggle with designs that are either too busy or too trendy, losing that warm, nostalgic holiday charm.
Vintage holiday nails bring timeless elegance back into your manicure. With subtle colors, classic patterns, and delicate details, you can create a look that feels both festive and nostalgic — without overcomplicating the process.
What Makes a Holiday Nail Design “Vintage”?
Before we dive into designs, it’s important to know what “vintage” means in nail art:
- Color palette: muted reds, forest greens, soft gold, creamy whites, and antique blues
- Design elements: stripes, polka dots, snowflakes, retro ornaments, candy cane twists
- Finishing touch: a slightly softened or matte finish for authenticity
The goal is timeless charm, not over-the-top sparkle.
5 Nostalgic Vintage Holiday Nail Designs
1. Classic Red with Gold Tips

- Base: Creamy, muted red
- Tip: Thin, metallic gold line for understated glamour
Pro Tip: Use a striping brush for the gold line. Keep it thin — too thick will overpower the vintage look.
Step-by-Step:
- Apply base coat and let dry.
- Paint two thin coats of red polish.
- Using a fine brush, draw a gold line along the tip.
- Finish with a satin top coat for that soft, classic glow.
2. Candy Cane Stripes

- Base: Soft white
- Design: Diagonal red stripes, reminiscent of classic candy canes
Pro Tip: Wrap a small piece of scotch tape diagonally to keep lines straight and crisp.
Step-by-Step:
- Base coat + two coats of white polish.
- Once dry, place tape diagonally across the nail.
- Paint red polish over tape areas. Remove tape carefully.
- Seal with a glossy top coat.
Common Mistake: Using thick stripes — vintage candy canes are delicate, not chunky.
3. Retro Snowflakes
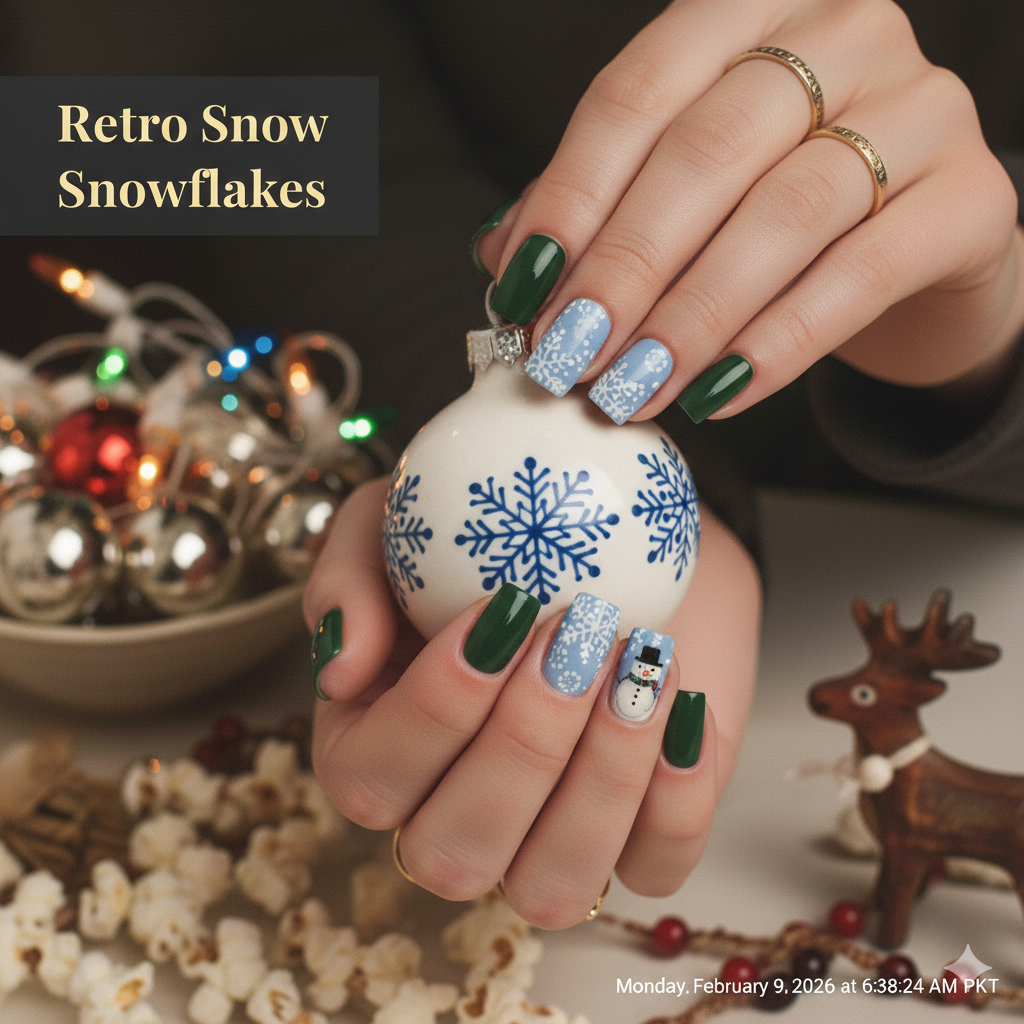
- Base: Powdery blue or mint green
- Design: Small white snowflakes with tiny dot accents
Pro Tip: Use a toothpick or dotting tool for precision instead of brushes.
Step-by-Step:
- Apply base coat + 2 coats of base color.
- Draw small snowflake patterns with white polish.
- Add tiny dots around each snowflake for dimension.
- Apply a matte top coat to give a retro effect.
Pro Tip: Keep snowflakes small and scattered; overcrowding looks modern, not vintage.
4. Mid-Century Ornament Dots
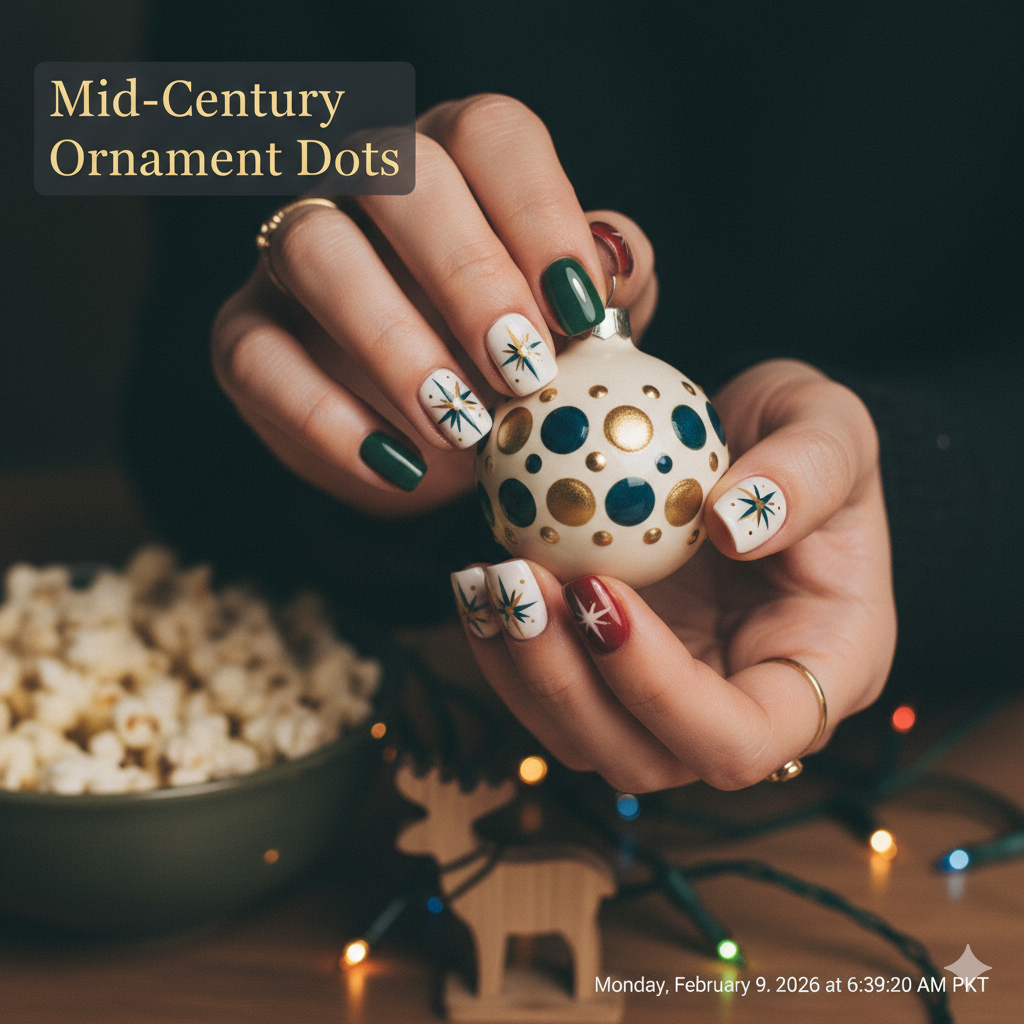
- Base: Cream or soft pink
- Design: Circular ornaments in green, red, and gold
Step-by-Step:
- Base coat + muted pink polish.
- Using a dotting tool, place circles in alternating festive colors.
- Add a thin gold line at the top of each dot for the ornament hanger.
- Top with a glossy finish.
Pro Tip: Vary the size of the dots slightly for a hand-painted, authentic vintage vibe.
5. Plaid Holiday Nails

- Base: Off-white or beige
- Design: Green and red plaid inspired by cozy holiday scarves
Step-by-Step:
- Base coat + off-white polish.
- Use a thin striping brush to paint horizontal and vertical red lines.
- Add thinner green lines within the red lines for depth.
- Finish with a satin top coat.
Common Mistake: Making lines perfectly symmetrical — slight imperfections give it vintage charm.
Pro Tips for Achieving Authentic Vintage Holiday Nails
- Thin layers are your best friend. Thick polish ruins delicate patterns.
- Soft finishes elevate the vintage look. Try matte or satin top coats instead of glossy shine everywhere.
- Work in stages. Let each layer dry completely before adding details.
- Tools matter. Toothpicks, dotting tools, and fine striping brushes give the control you need.
- Less is more. Don’t overcomplicate the nail — vintage charm is subtle.
Common Mistakes to Avoid
- Overloading nails with glitter or gems
- Using overly bright, modern reds or greens
- Drawing large, crowded snowflakes or patterns
- Rushing polish layers — leads to smudges
- Ignoring cuticle prep (messy cuticles make even perfect designs look unpolished)
Step-by-Step: General Workflow for Vintage Holiday Nails
- Prep: Remove old polish, file, and push back cuticles.
- Base Coat: Protect nails and smooth surface.
- Base Color: Apply 2 thin layers of your chosen muted shade.
- Design: Add stripes, dots, or snowflakes depending on your chosen style.
- Top Coat: Matte or satin finish to complete the vintage look.
- Clean Up: Use a small brush dipped in polish remover for perfect edges.
Budget-Friendly Tips for Festive Designs
- Affordable dotting tools: Toothpicks work perfectly for small details.
- DIY striping tape: Scotch tape or painter’s tape can replace expensive striping tape.
- Mix and match polish: Use what you already own — muted shades work best for vintage.
- Top Coat Tricks: Matte top coat doesn’t have to be expensive; even $2 drugstore options work.
Final Thought From a Pro Nail Tech
Vintage holiday nails are about bringing warmth and nostalgia to your manicure. With muted tones, delicate patterns, and careful finishing, you can recreate a look that’s both festive and timeless.
💬 What vintage holiday nail design are you most excited to try this season — classic red tips, candy cane stripes, or retro snowflakes?